Diagnostics and recommendations for configuring printing on a USB printer
Before starting the setup, please update the device's built-in KeeneticOS operating system to the latest version according to the instructions ???.
Connect the printer to the router via a USB port. If you used a USB extension cable to connect the printer, try connecting the printer to the router using a standard USB cable (do not use an extension cable, as it may cause the printer to malfunction).
Important
These instructions only apply to connecting a printer to a router's USB port. These instructions do not apply to connecting a printer via Wi-Fi or Ethernet.
A Keenetic router does not support printers on its own. It only provides a bridge between the printer driver installed on the computer and the USB LP driver on the router using TCP/IP protocol via JetDirect technology or Microsoft's CIFS network file system. The printer driver provides printing support, and the router only transmits the commands generated by it to the printer.
To connect to a network printer on your computer, you need to use a driver that is specifically designed for your printer model. Do not use a compatible driver, such as Brother Printer Series, HP Postscript Driver, Samsung Universal Print Driver, etc. You must install the driver for your specific model, such as Brother DCP-7057R, HP LaserJet 1020 or Samsung SCX-4200, from the manufacturer's website or the CD-ROM included with the printer.
If your USB printer is not on our list of supported printers, it means that it has not been tested in our lab, and we have not received confirmation from users. In this case, we cannot guarantee its performance, but this does not mean that it will not work when connected to the router. It is not possible to test routers with all printers available on the market. Even so, try configuring it according to the following scenarios:
Setting up with JetDirect: Connecting a printer in Direct mode
Setting up via CIFS (SMB protocol): Connecting a printer
Notice
In our experience, we have found that it is usually not possible to connect printers that use the GDI (Graphical Device Interface) interface to a Keenetic router. The GDI printing system is commonly used on budget printers. GDI printers are sometimes referred to as Windows printers. They use so-called Host-Based printing (via a Host-Based driver), where the computer or host resources are used to process print commands and rasterisation data. In our practice, we have encountered cases where it was possible to connect a GDI printer to the router when the printer utilised a standard set of commands and libraries that are present in the Linux system. We can confirm that, at the moment, Keenetic routers will not work with Canon CAPT printers (LBPxxxx series). You can find a complete list of such models in section 2.2 below.
If the printer does not work correctly through the Keenetic router, please contact our technical support with the full name of the printer and attach the self-test.txt system file.
Below is a sequence of recommended actions, depending on the situation.
1. The printer does not appear in the router's web interface on the System Dashboard page in the USB Drives and Printers panel.
1.1. Connect the printer using the standard USB cable. It is recommended to use a direct connection when connecting the printer (do not use a USB extension cable). If necessary, use a short USB extension cable up to 1 metre long.
1.2. Ensure that the SMB file and printer sharing) component is installed. You can do this on the General System Settings page in the KeeneticOS Update and Component Options section by clicking Component options.

1.3. Check if the printer is listed in the USB devices list in the system file self-test.txt in the section <file name="sys:kernel/debug/usb/devices">.
If it is, use the CLI commands (router command line) for further diagnostics.
Check the printer's ID, name, status, type, and connection status with the command:
(config)> show printerFor example:
(config)> show printer

printers:

printer, id = 0924:42af:     < printer id
name: Xerox                  < printer name
status: READY                < printer status: READY or ERROR
type: direct                 < direct – printer is connected via JetDirect
attached: yes                < connection status: yes - printer is attached
In some cases, the ERROR status may be caused by the printer ‘falling asleep’ (the printer is in standby mode). As a rule, this does not prevent documents from being printed, but to check, try ‘waking it up’.
Additionally, when connecting older printer models, the ERROR status may be caused by incorrect status transmission to the router. This also does not prevent you from printing documents. Try printing without paying attention to the current printer status.
1.4. Determine whether the printer needs to load firmware when turned on. As a rule, printer firmware needs to be loaded in the following cases:
Printers from the list: HP LaserJet P1505 / P1008 / P1007 / P1006 / P1005 , 1020, 1022 and 1018 (the P1102 model does not require firmware to be loaded!).
The following messages are displayed in the router's system log (on the Diagnostics page) when the printer is connected:
Apr 25 13:32:39ndmkernel: drivers/usb/class/usblp.c: usblp1: failed reading printer status
Apr 25 13:32:39ndmPrinter::Manager: failed to read "HP LaserJet 1018" printer status: probably it needs a firmware file.
This is not 100% proof that the printer requires firmware, but it is a reason to check this possibility.
Connect the USB printer to your computer and print a page. Then, without turning off the printer, disconnect it from the computer and connect it to the router's USB port. If the printer is then recognised in the router's web interface and starts printing through it, it means that it has received the firmware from the driver installed on the computer and that this is necessary for it to work.
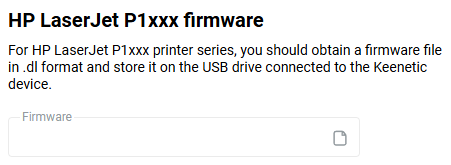
1.5. For HP LaserJet P1xxx series printers (the list of which is given above in section 1.4), the printer firmware in .dl format can be uploaded to the router. To do this, click the HP LaserJet P1xxx firmware link, specify the firmware file, and click Select. Firmware files for these printers can be found in the archive .
2. The printer is displayed in the router's web interface (on the System Dashboard page under USB Drives and Printers), but it does not print.
2.1. Ensure that a firewall on your computer is not blocking the printer (the spoolserv.exe print spooler process accessing port 9100 on the router). To check printing, temporarily disable the firewall or allow port 9100 in its settings.
2.2. Check whether your printer is a Canon CAPT printer. CAPT (Canon Advanced Printing Technology) is a type of GDI; therefore, it is not supported by Keenetic devices. When connected to a router, such a printer is detected and reports readiness (READY), but does not print. An approximate list of CAPT printers from Canon: LBP-810, LBP-1120, LBP-1210, LBP2900, LBP3000, LBP3010, LBP3018, LBP3050, LBP3100, LBP3108, LBP3150, LBP3200, LBP3210, LBP3250, LBP3300, LBP3310, LBP3500, LBP5000, LBP5050, LBP5100, LBP5300, LBP6000, LBP6018, LBP6020, LBP6200, LBP6300, LBP6300n, LBP6310, LBP7010C, LBP7018C, LBP7200C, LBP7210C, LBP9100C, LBP9200C.
2.3. Some printers, such as the HP LaserJet P1xxx series, support the Smart Install feature. For such a printer to work correctly with a Keenetic router, this feature must be disabled. To do this:
Connect the printer to your computer using a USB cable. Turn on the printer.
On the supplied disc or in the driver distribution kit, there is a folder called
UTIL. Find theSIUtilityutility in it. Run it.Follow the on-screen instructions to disable the Smart Install feature on the printer.
2.4. There are a number of specifics when connecting an HP LaserJet 1018 printer. For this printer to work correctly, we recommend using the printer firmware file sihp1018.dl or sihp1020.dl from the article.
In the router settings, specify the connection type as Direct, disable two-way data exchange with the printer, and then create a JetDirect connection to the printer on your computer. Select HP LaserJet 1022n Class Driver as the driver. This driver allows the printer to work without errors over the network. Since two-way data exchange has been disabled in the router settings, it must also be disabled on the computer (in the printer Properties on the Ports tab).
2.5. Enable printer debug mode using the router command-line interface (CLI) commands listed below. Before proceeding, ensure that you disable any applications unrelated to the printer (Transmission, DLNA, FTP server, VPN, udpxy server) for the duration of debugging, so that unnecessary debugging does not overwrite useful data.
For example:
(config)>show printerprinters: printer, id = 0924:42af < printer id name: Xerox status: READY type: direct attached: yes (config)>printer 0924:42af< choose the printer, where 0924:42af – printer id Printer::Manager: done. (config-printer)>debug level 3< enable debug mode (config-printer)>exit
2.6. Check whether printer debug mode is enabled. If it is enabled, the command show printer will return the line debug level 3.
For example:
(config)> show printer

printers:

printer 0924:42af
name Xerox
type direct
port 9100
bidirectional
debug level 3     < printer debug mode is enabled
The printer debug mode remains enabled until the router is rebooted. If you want to save the mode after rebooting, execute the command:
(config)> system configuration saveTo disable debug mode, execute the command:
(config)>printer 0924:42afPrinter::Manager: done. (config-printer)>no debug< disable debug mode
Printer debug mode is enabled for a specific printer by its ID via the router's command-line interface. To enable printer debug mode, you do not need to enable debug mode via the web interface on the Diagnostics page.
2.7. Sometimes, a technical support engineer may ask you to collect a dump of network packets from a computer connected to the router. Collect the packet dump using Wireshark: Capturing network packets with Wireshark. To reduce the size of the dump, you can use an additional capture filter in the Wireshark settings: ip.addr==<router_ip_address> (e.g., ip.addr==192.168.1.1).
Then, on the computer experiencing the problem, send the file to print via the printer installed and connected to the router. If printing does not start, repeat the print request.
After waiting (no more than 3 minutes), when it is clear that this is not a printing delay and the printer is really not printing, stop and save the Wireshark packet dump and the router's self-test.txt system file. Send both files to technical support.
Note
1. One limitation is that two identical USB printer models cannot be connected to the router at the same time, as in this situation, there will be two identical identifiers for the connected devices in the system, and the router's operating system will not be able to work with them correctly. Therefore, two identical printer models cannot be connected to the router. If the connected models are different, their identifiers will also be different, and there will be no problems with operation.
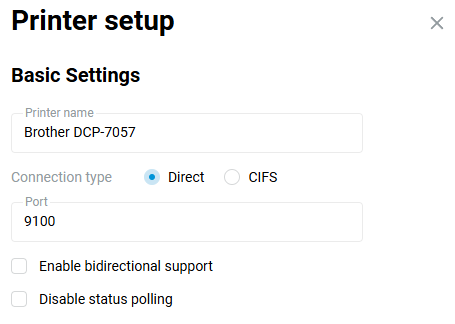
2. Sometimes situations arise when the printer prints continuously (cannot stop) or prints a set of different characters instead of the desired text. In this case, you can try disabling the Enable bidirectional support option. If possible, this mode should be disabled for correct operation with the router. Some printers allow you to disable bidirectional mode in their settings/properties. To disable this mode in the router, go to the Applications in the web interface and click on the connected printer in the USB Devices section. The Printer setup. window will appear. Make sure that the Enable bidirectional support option is disabled. Then click the Save button.