Segments
Note
Instructions for KeeneticOS 5.0 and earlier can be found in the article Network segments (for OS 5.0 and earlier).
Keenetic routers allow you to segment your network into isolated zones: Home network and Guest network.
Dividing a network into segments improves its security and optimizes its performance. By default, client devices in additional segments have access only to the Internet and, if necessary, to each other within the segment. Even if attackers or bots gain access to one of the segments, the remaining segments will remain inaccessible to them — provided that access between segments has not been enabled.
For example, if an unwanted device connects to an additional segment, that device will not be able to access devices in other segments — such as computers, smart home devices, video surveillance systems, or similar devices. The same applies to viruses and malware from guest devices. For more stable performance, you can isolate certain devices into a separate segment and limit their maximum speed within that segment so they do not interfere with other clients on the network.
You can use segments to create an additional local network on Keenetic devices. A segment is a logical interface that can include one or more available physical interfaces, such as router ports and Wi-Fi access points. Within a single segment, all interfaces are combined into a network bridge. In the segment settings, you can specify a name, configuration, and schedule for the Wi-Fi network; limit Internet access speed or block it entirely; select wired ports; and configure VLANs, network addressing, and the DHCP server.
Example of creating a new segment with a Wi-Fi access point
Let's say you need a separate, password-protected Wi-Fi network for guests, but you didn't set it up during the Initial Setup Wizard. As an example, we'll create a new segment with a guest Wi-Fi network and assign a router port to that segment.
In the My Networks and Wi-Fi menu section, on the Segments page, tap +.
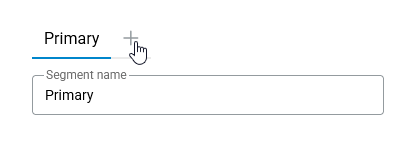
My Networks and Wi-Fi → Segments
In the Segment name field, enter a name for the segment, such as Guests (this is not the Wi-Fi network name). Save your settings by tapping the Save button at the bottom of the page.
For security reasons, it's best to ensure that you cannot access the router's settings or add it to a mobile app when connected to a guest network; therefore, the Access the applications running on your Keenetic device option should remain disabled. For the primary segment, this option is enabled and cannot be changed via the web interface.
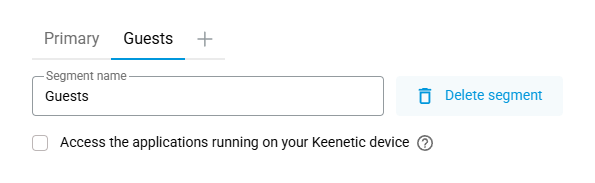
My Networks and Wi-Fi → Segments
After creating a segment, click Add wireless network.
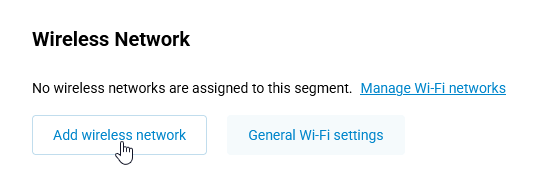
My Networks and Wi-Fi → Segments
In the Name (SSID) field, enter the name of the Wi-Fi network; in this example, it will be Guests. Enable the desired Wi-Fi Bands by clicking them. In the Network protection field, select the WPA2-PSK encryption type for broad compatibility with Wi-Fi clients. Then, in the Password field, enter a password for this Wi-Fi network.
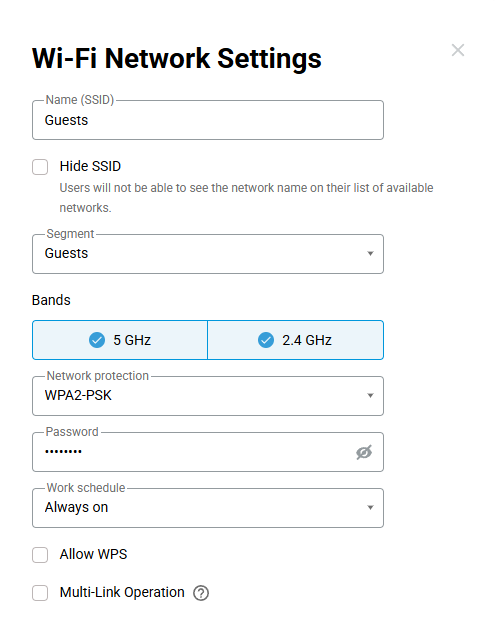
My Networks and Wi-Fi → Segments → Add wireless network
You can also set a Work schedule and enable Roaming for Wireless Clients on your Wi-Fi network.
Since this segment and its Wi-Fi network are intended for guests, it is advisable to enable the Client Isolation option. This option prevents wireless clients from exchanging information with all other clients on the segment; however, it does not restrict communication between wired clients on the segment. To apply the Wi-Fi network settings, click Add.
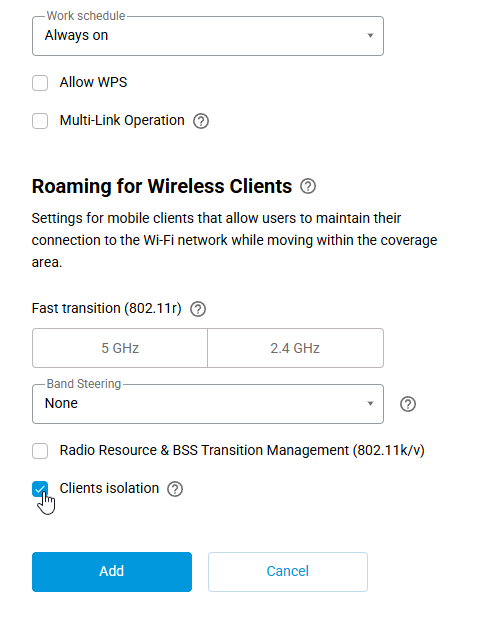
My Networks and Wi-Fi → Segments → Add wireless network
At this stage, you can turn on Wi-Fi by setting the wireless network switch to the On position. However, it is best to turn on Wi-Fi after the segment configuration is fully complete.
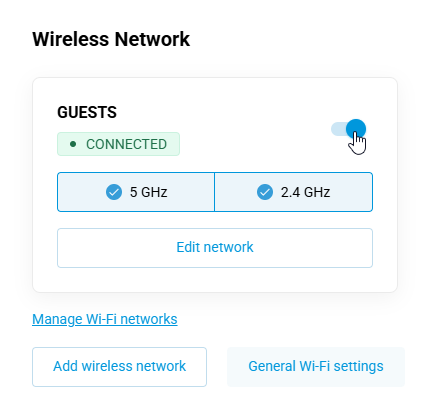
My Networks and Wi-Fi → Segments
You can view a list of all the Wi-Fi hotspots you've created on the Access Points page.
Important
There is a limit to the number of Wi-Fi access points you can create. You can create up to 7 access points per band on the router. On a dual-band router, you can create up to 14 access points — 7 on the 2.4 GHz band and 7 on the 5 GHz band. There are no restrictions when creating additional segments without Wi-Fi access points.
In the Ports and VLANs Settings section, you can select which router ports will be included in specific segments. For Port 3 in the Guests segment, set the status to Belongs to segment. When a client device connects to Port 3 on the router, it will receive IP settings from this segment.
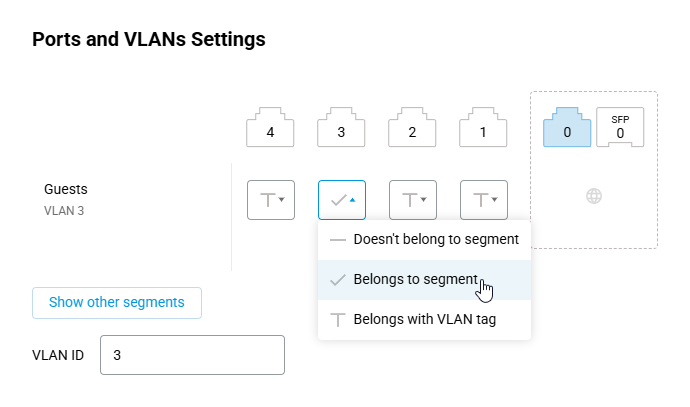
My Networks and Wi-Fi → Segments
Initially, when a segment is created, a free subnet from the private IP address range 192.168.xx.xx will be automatically assigned to it; however, if you need to change the subnet address, you can specify a different available subnet in the IP address field under the IP Settings. In our example, the guest segment will have the subnet 192.168.2.x (192.168.2.1, subnet mask 255.255.255.0). For more information on changing the IP address and DHCP settings, see the article Changing IP and DHCP settings in the Home segment.
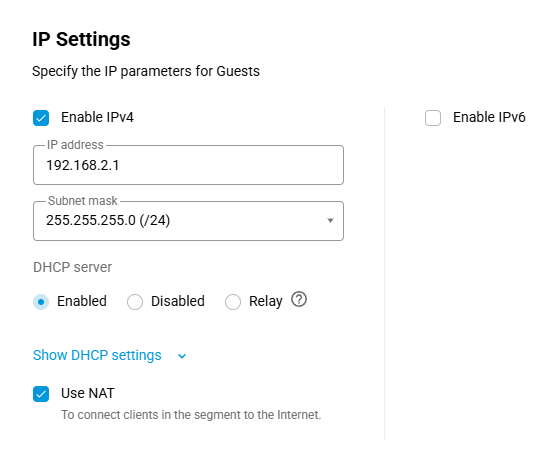
My Networks and Wi-Fi → Segments
Tip
After changing the subnet settings, it is recommended that you reconnect the clients in that segment so that they can obtain the new IP settings from the DHCP server. If you do not do this, the clients will update their network settings on their own — not immediately, but after some time.
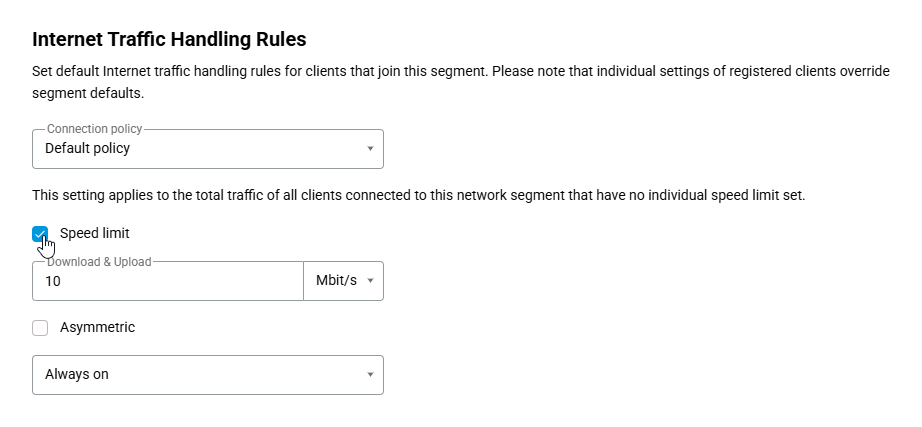
Under the Internet Traffic Usage Rules, you can use Connection Policies to specify which connections clients in this segment will use to access the Internet, or whether they will be blocked from accessing it altogether. For example, if a router has multiple Internet connections, you can use Connection policies to force clients in this segment to access the Internet only through a backup connection. However, if a specific policy has been manually set for a registered client, that client will ignore the policy set for the segment. For a registered client to use the policy configured on a segment, the client must have the Segment default policy applied. For information on creating policies, see the article Connection policies.
In our case, since this is a guest network, enable the Speed Limit option and set the limit to 10 Mbit/s or another value you deem appropriate, so that guests cannot use up all the available Internet connection speed. This speed limit is shared among all clients in the segment. You can also set a schedule for the Speed Limit option. The Speed Limit option is not available in the web interface for the primary segment.
My Networks and Wi-Fi → Segments
If you need to set up a public guest network without a password but with user authentication, you can use a Captive portal. To enable the Captive portal, you'll need to install the appropriate component. You cannot enable the Captive portal for the primary segment through the web interface.
Note
By default, access between segments is prohibited. There are two ways to allow access between segments:
Recommended method.
In the Firewall rules for the Primary segment interface, create a
Permitrule specifying the subnet of the additional segment. In our example, this is theSubnetwith the IP address192.168.2.0, the subnet mask255.255.255.0, and theIPV4protocol.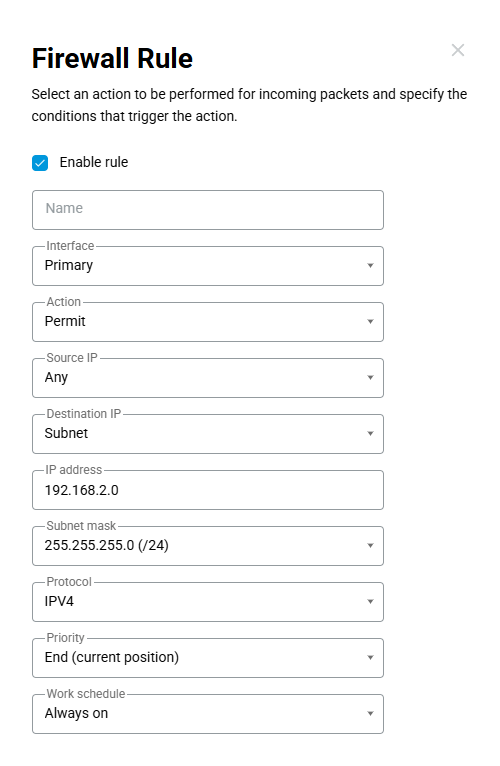
Network Rules → Firewall → Add rule
In this case, clients in the additional segment (192.168.2.x) will be accessible from the primary network segment (192.168.1.x).
If reverse access from the additional segment to the primary segment of the network is required, you must create a similar rule for the additional segment (
Subnetwith IP address192.168.1.0, subnet mask255.255.255.0, andIPV4protocol).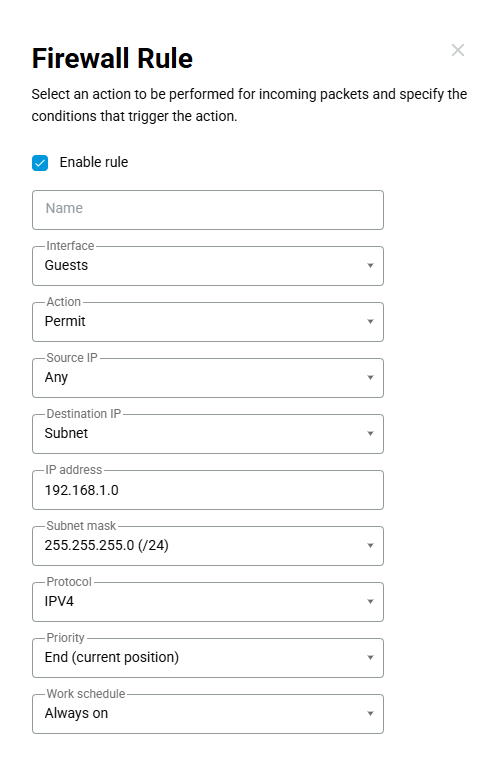
Network Rules → Firewall → Add rule
A method that is not recommended.
In Keenetic command-line interface (CLI) you can execute the commands:
no isolate-private
system configuration save
Important
Use this method with caution, as it may be unsafe. Executing these commands will allow traffic to flow between all local (private) interfaces. In this case, access will be enabled between all router segments.