Connecting to a WireGuard VPN from Windows
Starting from KeeneticOS version 3.3, you can use WireGuard VPN to connect to the local network of the Keenetic router remotely.
First, you need to configure the WireGuard server on the Keenetic device. The following instruction shows the process: Configuring a WireGuard VPN between two Keenetic routers. Then move on to the VPN client setup.
Important
If you want to configure a Keenetic router as a VPN server, make sure that it has a public IP address, and when using the KeenDNS service, that it works in the 'Direct access' mode. If any of these conditions are not met, connecting to such a server from the Internet will be impossible.
Below is an example of connecting to a server from a Windows operating system, using Windows 10 1909 (19H2) as a reference.
To connect to the Keenetic WireGuard server on a Windows-based computer, you will need to download and install the WireGuard program from the official website.
Launch the program and click on the down arrow next to Add Tunnel in the lower-left corner. Select Add empty tunnel... [Ctrl+N].
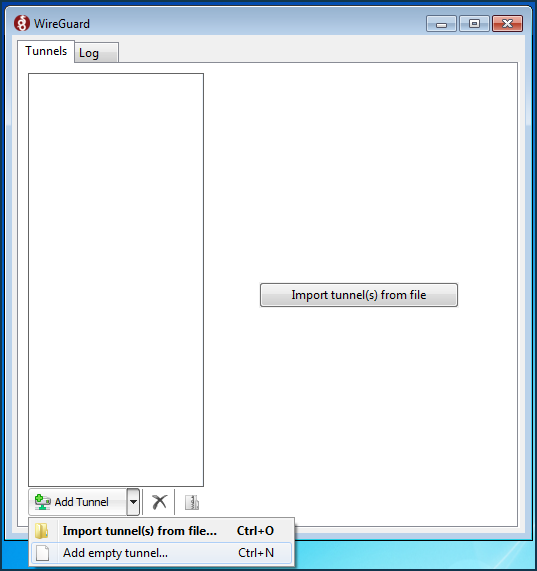
The configuration window for connection to the remote WireGuard server Keenetic → Create new tunnel — will open.
Important
Leave this window open, do not close it.
Download wg-client.conf file to your computer. You can save it to your Desktop. Open it in a text editor, for example, in Notepad++.

You will see a ready-made configuration in which you will need to enter the settings for the Windows WireGuard client
[Interface]and the remote WireGuard server Keenetic[Peer].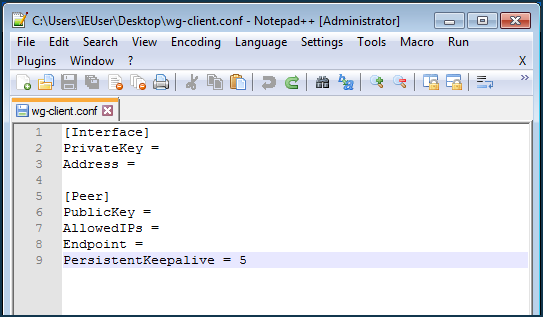
Important
Leave this window open, do not close it.
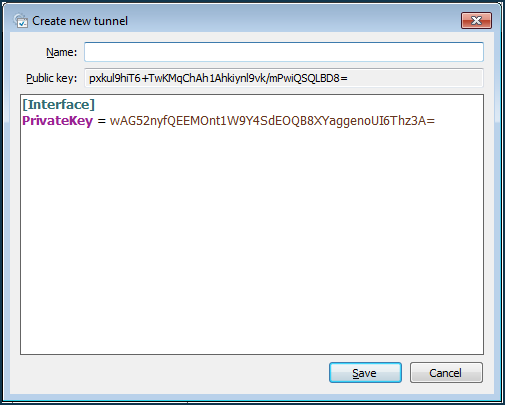
Go back to the Create new tunnel window of step 1 and copy the Windows WireGuard client private key to your computer clipboard from the
PrivateKey =field.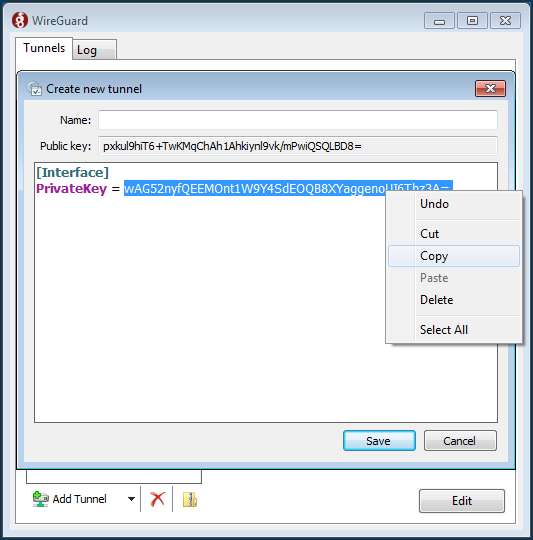
Important
Leave this window open, do not close it.
The copied WireGuard client private key must be inserted into the ready-made configuration from step 2 into the
PrivateKey =line.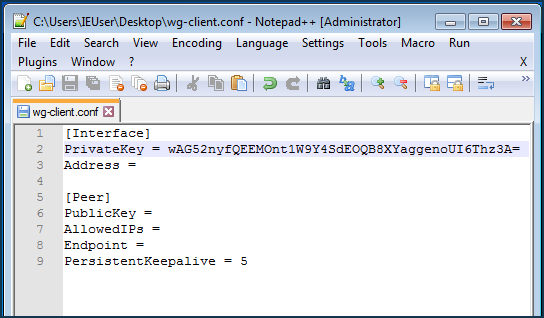
Important
Leave this window open, do not close it.
Now, set up a remote connection on the previously configured WireGuard server side.
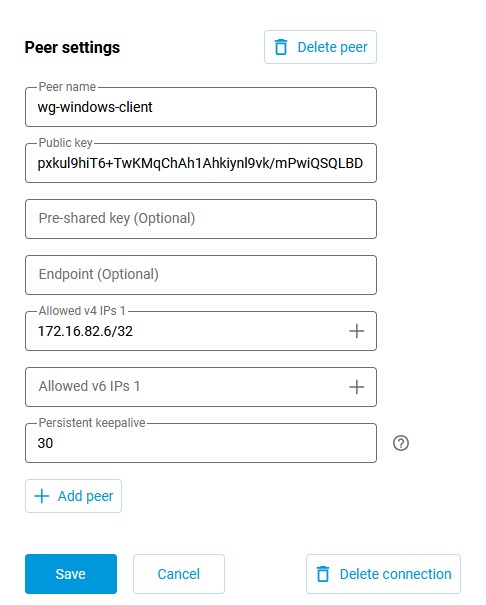
Connect to the router's web interface and go to the Internet → Other connections menu. Click on the previously created WireGuard connection (
WG-S) and then the Add Peer button. Enter the name of the tunnelwg-windows-clientin the opened form of the peer settings.In the Public key field of the web interface, insert the Windows WireGuard client key from step 1, which should be copied from the Public key field to the clipboard.

You can close the Create new tunnel window, click Cancel.
Important
Leave the WireGuard connection window open, do not close it.
In the Allowed v4 IPs fields, specify the address from which traffic will be allowed to the server in IP/bitmask format —
172.16.82.6/32.In the Persistent keepalive field, specify the frequency of attempts to check the availability of the remote connection side. Usually, a
10-15second interval between checks is sufficient. By default, the Persistent keepalive value in peer settings is30seconds.Click Save.
Back to configuring
wg-client.conf[Interface] PrivateKey = IFSgdLsL/hRswYdF/5QlLwUnxm2/VLM4vDUV8Gbmb1I= Address = 172.16.82.6/24 [Peer] PublicKey = 1YVx+x3C817V9YdhUtpUhzyDLVj5tnK2m//WjFGynm4= AllowedIPs = 172.16.82.1/32, 192.168.22.0/24 Endpoint = enpwgwrkserver.dynns.com:16631 PersistentKeepalive = 5
Configuring the client [Interface]:
In the PrivateKey field of the
[Interface], you have already entered the Windows WireGuard client key in step 4.Set the IP address in the Address field of the WireGuard client in IP/bitmask format —
172.16.82.6/24(internal tunnel address). It is possible to use a different subnet, choosing it from the private address range and avoiding overlapping with other subnets configured on these devices.Configuring the server [Peer]:
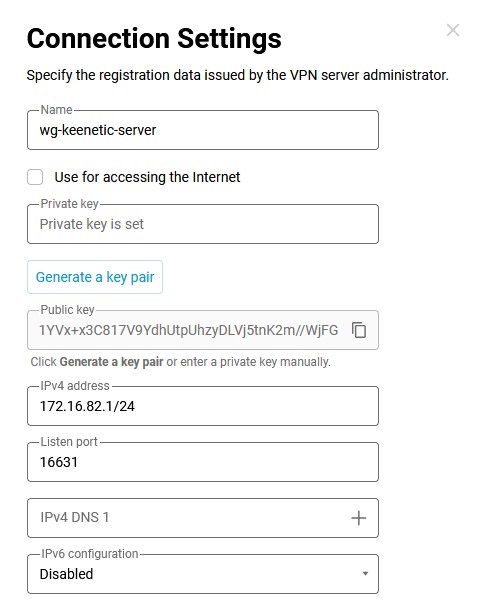
In the PublicKey field, insert the public key of the server, which can be copied to the clipboard from WireGuard settings in the web interface of the router:
In the Allowed IPs field, enter the allowed IP addresses in IP/bitmask format —
172.16.82.1/32(internal server address) and192.168.22.0/24(local segment address of the Keenetic router).In the Endpoint field, enter the public IP address or domain name of the WireGuard server and the listening port on which the WireGuard client will set the connection.
In the PersistentKeepalive field, specify the frequency of attempts to verify the availability of the connection's remote side. Usually, a
10-15second interval between checks is sufficient.Press the
Ctrl+Skey combination or select the File → Save menu.In the open WireGuard connection settings window from step 6, click on Import tunnel(s) from file and select
wg-client.confon the Desktop, click on Open.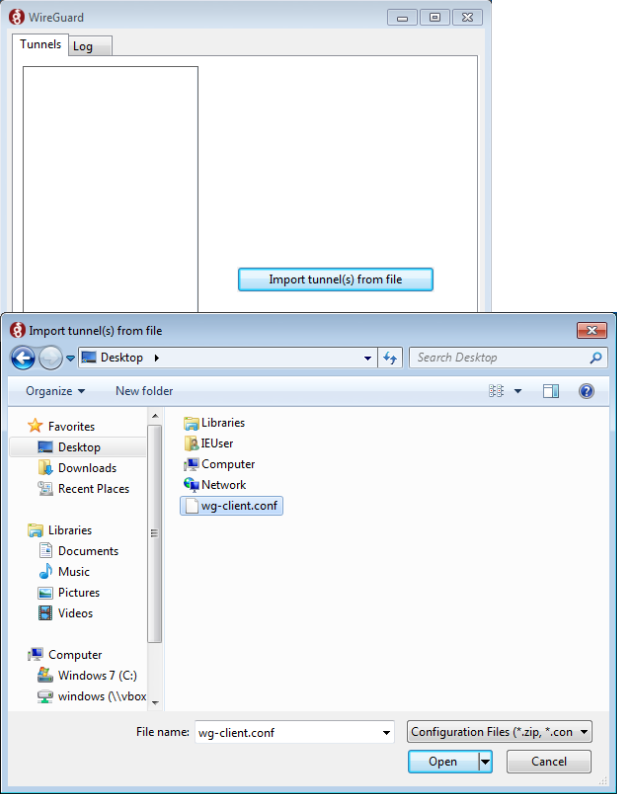
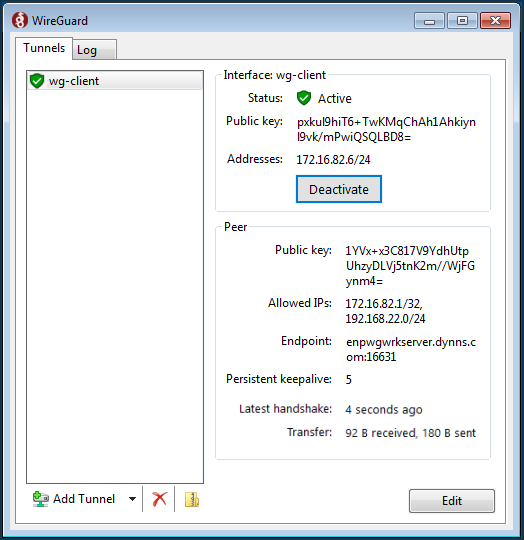
After adding the
wg-clientconfiguration to WireGuard, a new connection will appear in the Tunnels list.Click Activate.
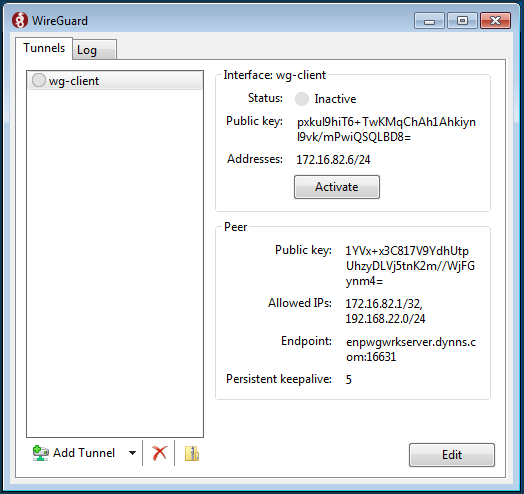
If the setting is correct, you will see a green indicator in front of the Status line.
You can send ICMP packets to its IP address at the Windows command line to verify server availability.
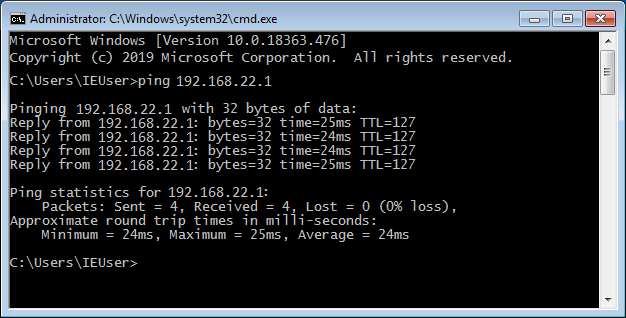
Check the availability of the server web interface (in our example, it is a Keenetic with IP address
192.168.22.1).
The setup is complete.
If you want to allow the connected clients to access the Internet through this VPN connection, make an additional configuration from this article Internet access via WireGuard VPN.
Please note that on the VPN client side, in the wg-client.conf configuration file, in the [Interface] section, you need to specify the DNS server in the DNS = field. In our example, the Google DNS server address is set to 8.8.8.8 and 0.0.0.0/0 value for AllowedIPs =
[Interface] PrivateKey = IFSgdLsL/hRswYdF/5QlLwUnxm2/VLM4vDUV8Gbmb1I= Address = 172.16.82.6/24 DNS =8.8.8.8[Peer] PublicKey = 1YVx+x3C817V9YdhUtpUhzyDLVj5tnK2m//WjFGynm4= AllowedIPs = 172.16.82.1/32, 192.168.22.0/24,0.0.0.0/0Endpoint = enpwgwrkserver.dynns.com:16631 PersistentKeepalive = 5
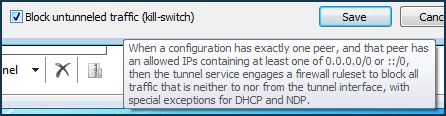
Note
Provided that there is one peer in the configuration and the allowed network all addresses is specified, the application will automatically generate a firewall rule on the computer that prohibits traffic past the tunnel.