Client e server OpenVPN
OpenVPN è uno dei protocolli più popolari per la connessione VPN. Può essere utilizzato per creare una rete privata virtuale o per interconnettere reti locali. OpenVPN è open source e distribuito gratuitamente sotto la licenza GNU GPL. Fornisce velocità di connessione più elevate rispetto ad altri protocolli VPN. Inoltre, OpenVPN può essere definito uno dei protocolli più sicuri. Tutti i dati trasmessi sono protetti in modo sicuro dalla libreria di crittografia OpenSSL e dai protocolli SSLv3/TLSv1, che garantiscono elevata sicurezza e anonimato.
Il router Keenetic è dotato delle modalità TCP e UDP per la connessione OpenVPN, l'autenticazione TLS, l'uso di certificati e chiavi di crittografia per aumentare la sicurezza della connessione VPN.
Importante
Il router Keenetic che ospiterà il server OpenVPN deve essere connesso a Internet con un indirizzo IP pubblico e, quando si utilizza il nome di dominio KeenDNS, deve essere configurato in modalità Accesso diretto. Se una di queste condizioni non viene soddisfatta, non sarà possibile connettersi a tale server da Internet.
L'installazione del componente di sistema 'Client e server OpenVPN' è necessaria per configurare la connessione OpenVPN. Con questo componente, è possibile utilizzare sia il client che il server OpenVPN nel tuo Keenetic. È possibile installare il componente di sistema nella pagina 'Impostazioni di sistema' nella sezione 'Aggiornamento Keenetic e opzioni dei componenti' facendo clic su 'Opzioni dei componenti'.

La modalità OpenVPN (client o server) è definita principalmente dal suo file di configurazione.
Importante
Requisiti di configurazione OpenVPN per l'uso in Keenetic:
La configurazione deve essere in un unico file.
Certificati, chiavi, ecc., devono essere inclusi in questo file.
Nella configurazione, è necessario utilizzare solo le opzioni elencate nel documento: OpenVPN 2.4 ManPage.
Alcune delle opzioni sopra descritte potrebbero non essere supportate. Ad esempio, la nostra implementazione di OpenVPN non supporta le opzioni relative a IPv6.
L'ordine delle opzioni e dei certificati e delle chiavi abilitati non è importante.
Le chiavi OpenSSL devono essere impostate senza password perché l'interfaccia di Keenetic non ha un'opzione per inserirla.
Il file di configurazione OpenVPN non viene salvato nel file di configurazione
startup-config. Per ottenere un backup delle impostazioni dell'interfaccia client OpenVPN, è necessario salvarlo separatamente.
Per i modelli KN-1110, 1210, 1310, 1410, 1510, 1610, 1710, 1810 e 1910 il numero di connessioni client è limitato dalla dimensione della partizione di memoria di servizio allocata di 24 Kbyte per l'archiviazione delle configurazioni VPN. Questo è particolarmente importante per le connessioni OpenVPN perché la dimensione totale delle loro configurazioni non deve superare i 24 Kbyte. Per i modelli Keenetic moderni con indice KN-XXXX la dimensione della memoria, in cui il file di configurazione startup-config e le variabili d'ambiente (comprese le chiavi) sono inseriti in forma compressa, è stata aumentata e varia da 260 Kbyte a 2 Mbyte (a seconda del modello).
Consideriamo un esempio di connessione OpenVPN di tipo 'site-to-site'.
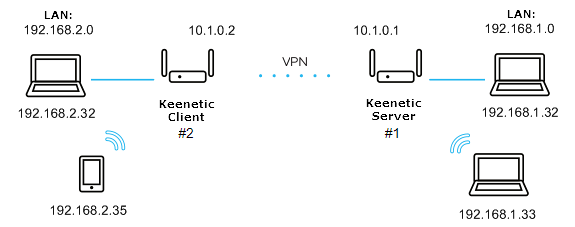
Collegheremo il client Keenetic#2 (segmento Home 192.168.2.0/24, indirizzo tunnel: 10.1.0.2) al server su Keenetic#1 (segmento Home 192.168.1.0/24, indirizzo tunnel: 10.1.0.1)
Per prima cosa, esaminiamo la configurazione più semplice utilizzando una chiave segreta condivisa.
La configurazione minima del server OpenVPN per Keenetic#1:
dev tun
ifconfig 10.1.0.1 10.1.0.2
cipher AES-128-CBC
<secret>
  <--insert the secret key here
</secret>
verb 3
route 192.168.2.0 255.255.255.0
La configurazione minima del client OpenVPN per Keenetic#2:
dev tun
remote KEENETIC-1.mykeenetic.net <-- server's domain name or IP address
ifconfig 10.1.0.2 10.1.0.1
cipher AES-128-CBC
<secret>
  <--insert the secret key here
</secret>
verb 3
route 192.168.1.0 255.255.255.0
or
redirect-gateway def1
or
route 0.0.0.0 0.0.0.0 <-- if it's neccessary to route all the traffic in the tunnel
Generare una chiave segreta condivisa. Per fare ciò, scaricare e installare OpenVPN da qui: openvpn.net/downloads.html
In questo esempio, utilizzeremo la versione
2.4.6-I602per Windows.Dopo aver installato il software, riavviare il computer.
Per impostazione predefinita, il programma verrà installato nella cartella
C:\Programmi.Eseguire la riga di comando di Windows come amministratore. Andare su
C:\Program Files\OpenVPN\bined eseguire il comando:openvpn.exe --genkey --secret static.key
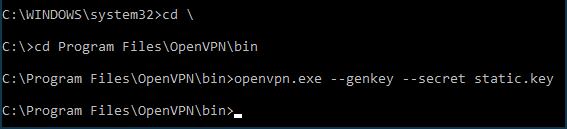
Aprire il file generato
static.keycon la chiave segreta condivisa in qualsiasi editor di testo (ad esempio Blocco note), copiare il suo contenuto negli appunti (Ctrl-A,Ctrl-C) e incollarlo (Ctrl-V) nelle posizioni appropriate dei file di configurazione del client e del server.Esempi di file di configurazione
static-server.ovpnper Keenetic#1 e file di configurazionestatic-client.ovpnper Keenetic#2 con chiave segreta condivisa sono allegati alla fine di questo articolo. In questi file sono presenti altre impostazioni di OpenVPN commentate (che iniziano con ';') che possono essere utilizzate in seguito, se necessario. È possibile utilizzare questi file di configurazione per la verifica sostituendo il nome di dominioKEENETIC-1.mykeenetic.ruinstatic-client.ovpncon il nome di dominio del proprio Keenetic#1 o il suo indirizzo IP pubblico e una chiave segreta condivisa con quella generata in entrambi i file.Andare alla pagina 'Altre connessioni' nell'interfaccia web del Keenetic#1 e fare clic su 'Crea connessione' nella sezione 'Connessioni VPN'. Nella finestra 'Impostazioni di connessione VPN (VPN Connection Settings)', selezionare 'OpenVPN' nel campo 'Tipo (protocollo) (Type (protocol))'.
Quindi, inserire il nome della connessione nel campo 'Nome connessione (Connction name)' e inserire il contenuto del file di configurazione
static-server.ovpnnel campo 'Configurazione OpenVPN (OpenVPN configuration)'. Salvare le impostazioni.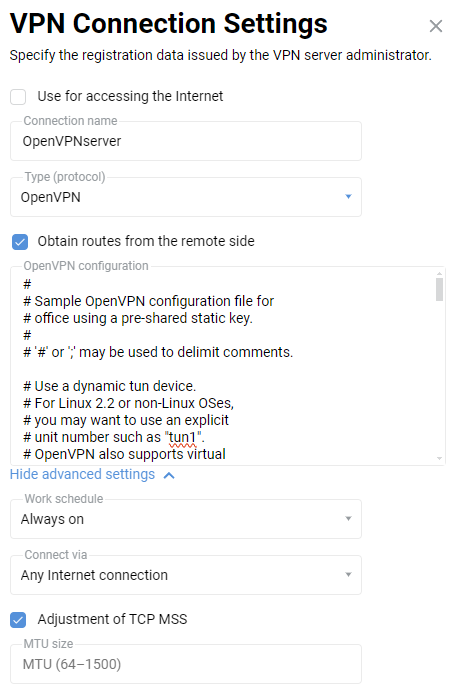
Importante
A partire da KeeneticOS
3.4.1il server funziona solo quando si specifica 'Connetti tramite' — 'Qualsiasi connessione Internet (Connect via - Any Internet connection)'.Allo stesso modo, aggiungere una connessione OpenVPN all'interfaccia web di Keenetic#2, ma con una configurazione
static-client.ovpn:
Inoltre, sul lato Keenetic#1 (server), i seguenti comandi dovranno essere eseguiti tramite l'interfaccia a riga di comando (CLI) del router:
interface OpenVPN0 no ip global
interface OpenVPN0 security-level private
Per consentire il traffico tra le interfacce
HomeeOpenVPN0, che hanno un livello di sicurezza privato, eseguire il comando:no isolate-private
Se si prevede di utilizzare questo server anche per connettere il client a Internet, eseguire il comando:
ip nat 10.1.0.2 255.255.255.255
e salvare le impostazioni con il comando:
system configuration save

Infine, è necessario aprire una porta per la connessione OpenVPN. La porta predefinita è
UDP/1194. Per fare ciò, creare una regola per l'interfaccia 'ISP' o per l'interfaccia utilizzata per accedere a Internet nella pagina 'Firewall' (oltre all'ISP, possono essere interfacce PPPoE, L2TP o PPTP).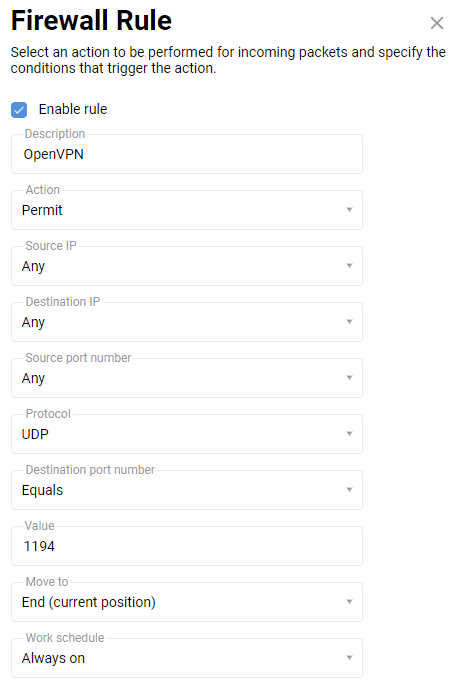
Nella finestra 'Regola del firewall (Firewall rule)', selezionare 'Consenti (Allow)' nel campo 'Azione (Action)', 'UDP' nel campo 'Protocollo (Protocol)' e in 'Uguale a (Equals)
1194' nel campo 'Numero di porta di destinazione (Destination port number)'.Dopo aver creato la connessione, impostare lo switch su Abilitato.

Questo completa la configurazione del tunnel OpenVPN. Nella pagina 'Altre connessioni' verranno visualizzati lo stato della connessione e le statistiche.
Per verificare, provare a eseguire il ping di entrambe le estremità del tunnel:
ping 10.1.0.1
ping 10.1.0.2
e quindi le sottoreti remote:
ping 192.168.1.1
ping 192.168.2.1
Nota
La configurazione dell'interfaccia OpenVPN non viene salvata nel file startup-config. A scopo di backup, si consiglia di eseguire il backup delle impostazioni OpenVPN in un file separato.
Se la connessione client OpenVPN deve essere utilizzata per accedere a Internet, assegnare a questa connessione la priorità più alta. Le informazioni sulle priorità sono disponibili nell'articolo "Priorità di connessione".
In alcuni casi, nella configurazione di OpenVPN è necessario specificare login e password per l'autenticazione durante la connessione a un tunnel VPN. Per fare ciò, è necessario aggiungere al file di configurazione una speciale sezione
auth-user-pass, specificando i valori di login e password. Ad esempio:<auth-user-pass> vpnclient # login r3d23xs87 # password </auth-user-pass>
Un esempio di creazione di chiavi e certificati in Windows per la connessione a un server OpenVPN è mostrato nell'articolo 'Configurazione di OpenVPN tramite autenticazione TLS a due vie'.
Errori e soluzioni comuni:
auth-user-pass senza dati di credenziali in linea non è supportatoIl file di configurazione contiene una riga per l'inserimento online di login/password, che Keenetic non supporta. Errore nel file di registro Keenetic:
OpenVPN0 auth-user-pass without inline credentials data is not supported
OpenVPN0 Exiting due to fatal error
Eliminare o commentare tutte le righe di questo tipo:
auth-user-passErrore dell'opzione
Block-outside-dnsL'opzione
block-outside-dnsè configurata sul server OpenVPN, che viene gestita correttamente solo in Windows. Errore nel file di registro Keenetic:OpenVPN0 Unrecognized option or missing or extra parameter(s) in configuration: (line X): block-outside-dns (2.4.4) OpenVPN0 Exiting due to fatal error
Aggiungere una riga al file di configurazione del client OpenVPN:
pull-filter ignore \"block-outside-dns\"Errore durante la connessione ai server PrivateTunnel
Quando si tenta di connettersi viene visualizzato un errore:
OpenVPN0 Unrecognized option or missing or extra parameter(s) in configuration: (line 3): client-ip (2.4.4)
Aggiungere una riga al file di configurazione del client OpenVPN:
ignore-unknown-option client-ip block-ipv6Si verifica un errore quando si utilizza l'opzione askpass
/storage/key.txt:Error: private key password verification failed
Questa è una limitazione dell'attuale implementazione di OpenVPN in Keenetic. È possibile utilizzare solo una chiave senza password o con una password fissa: '
password'.Dopo l'aggiornamento del router a KeeneticOS
3.9.1, il tunnel VPN verso i server OpenVPN di alcuni fornitori VPN potrebbe non essere più stabilito. Nel registro di sistema è possibile visualizzare i seguenti messaggi:W [Dec 15 16:52:58] OpenVPN6: DEPRECATED OPTION: --cipher set to 'AES-128-CBC' but missing in --data-ciphers (AES-256-GCM:AES-128-GCM:CHACHA20-POLY1305). OpenVPN ignores --cipher for cipher negotiations. Error: private key password verification failed
Il problema è il formato di crittografia obsoleto BF-CBC, che non è supportato a partire dalla versione client OpenVPN
2.5.0( KeeneticOS3.9utilizza la versione client OpenVPN2.6.0).Nota
Il cifrario
BF-CBCnon è più supportato nella configurazione predefinita. La versione OpenVPN2.5.0supporta i cifrariAES-256-GCMeAES-128-GCMper impostazione predefinita. È possibile modificare questo comportamento utilizzando l'opzionedata-ciphers, ad esempio, specificando nelle impostazionidata-ciphers AES-256-GCM:AES-128-GCM:BF-CBC. Per supportare nodi OpenVPN molto vecchi che non supportano la negoziazione del cifrario (modalità \"--cipher\"), è possibile specificaredata-ciphers-fallback BF-CBC.Quando si esegue l'aggiornamento a una nuova versione di OpenVPN, l'impostazione \"
cipher BF-CBC\" nei file di configurazione precedenti verrà convertita aggiungendoBF-CBCal setdata-ciphers. Inoltre, la modalitàdata-ciphers-fallbackviene attivata.Per installare correttamente il tunnel, sarà necessario modificare la direttiva:
cipher AES-128-CBCindata-ciphers AES-128-CBCodata-ciphers AES-256-GCM:AES-128-GCM:CHACHA20-POLY1305Se non funziona, modificare la direttiva:
cipher AES-128-CBCindata-ciphers-fallback AES-128-CBCPer la massima compatibilità di negoziazione del cifrario con il server remoto, specificare le seguenti direttive:
data-ciphers AES-256-GCM:AES-128-GCM:CHACHA20-POLY1305data-ciphers-fallback AES-128-CBCo
data-ciphers AES-256-GCM:AES-128-GCM:CHACHA20-POLY1305data-ciphers-fallback AES-256-CBCImportante
La crittografia dipende dal server OpenVPN remoto. Prima di modificare la direttiva
cipher, controllare il registro di sistema.Se nel registro viene registrato il seguente errore relativo alla dimensione della chiave:
[E] Dec 16 19:01:38 OpenVPN0: Unrecognized option or missing or extra parameter(s) in configuration: (line 22): keysize (2.6_git)
[E] Dec 16 19:01:38 OpenVPN0: Exiting due to fatal error
[E] Dec 16 19:01:38 ndm: Service: "OpenVPN0": unexpectedly stopped.Error: private key password verification failed
Quindi, nella configurazione del tunnel, è necessario rimuovere la direttiva dell'opzione
keysize 256, che è obsoleta per il client aggiornato OpenVPN2.6.0, e controllare di nuovo la connessione del tunnel.È possibile trovare informazioni dettagliate per l'opzione \"
keysize\" a questo link.
Si consiglia di leggere le seguenti informazioni: