Testing the bandwidth of a local connection with iperf
Iperf3 is a cross-platform console client-server program — a TCP and UDP traffic generator for network bandwidth testing. It allows you to easily measure the maximum network bandwidth between a server and a client and perform load testing on a network link.
You can download iperf3 from the https://iperf.fr/iperf-download website. Versions of the utility are available for download for different operating systems (Windows, macOS, Ubuntu, Debian, Mint, Fedora, Red Hat, CentOS, openSUSE, Arch Linux, FreeBSD).
For mobile devices running Android, you can use the Magic iPerf including iPerf3 app.
To perform testing, the program must be run on two devices (these can be computers, smartphones, or tablets). One of them will act as a server, and the other as a client. Data will be transferred between them to measure the connection's bandwidth.
Importante
To improve the accuracy of local network data transfer speed measurements, we recommend the following:
— When conducting tests, disconnect all devices from the router, leaving only the two hosts that will participate in the test.
— Before testing, determine the local IP address of the device that will act as the server (this can be done in the web interface on the Client lists) page.
— Before testing, check the physical channel speed of the devices in the router settings (for Wi-Fi clients on the Client Lists page and for wired clients on the System Dashboard page). The link must correspond to the maximum possible channel speeds. For example, if a device is connected via a network cable to a gigabit router, you need to use a 4-pair cable (8 wires) of category 5e or higher, and the link should be 1G/FDX (1 Gbit/s, full duplex). In lower-end models, it should be 100M/FDX (100 Mbit/s, full duplex). If the channel speed is lower or you see HDX mode (half-duplex), check the patch cord (Ethernet cable, twisted pair) for compliance with the standard, replace it, and also look into the network adapter settings (to see if the speed limit mode is set manually).
— Do not use traffic prioritization. If traffic prioritization is used, the hardware network accelerator (ppe hardware; hwnat) is disabled for the device, as the accelerator cannot work with traffic prioritization. With the accelerator disabled, the speed may decrease. On the Client Lists page, in the Traffic priority field, set the value to Normal (default) for devices used in testing.
— On the hosts participating in the testing, close all running user programs and applications that transmit data over the network.
— Disable the firewall on the hosts temporarily whilw testing, if it is enabled, or allow traffic through the ports used by iperf3 in their settings.
— When testing with Wi-Fi devices, such a device must be located near the router in direct line of sight from it at a distance of no more than 2 metres.
— Perform the test several times. By default, iperf3 transfers traffic from the client to the server, i.e. it measures the upstream speed. Also run the downstream speed test (from the server to the client) by using the -R key (enables Reverse mode) on the client.
When measuring the bandwidth of a link between two devices connected to a router at different speeds, the actual speed values obtained will be limited by the slowest connection. For example, if one host is connected at a speed of 1 Gbit/s and another at a speed of 100 Mbit/s, then when testing the bandwidth, the speed will not exceed 100 Mbit/s.
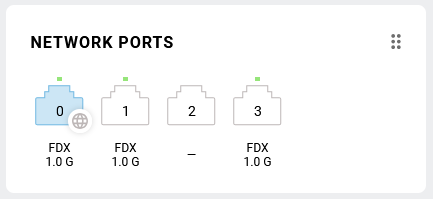
Example 1. Let's say you need to find out the bandwidth of a local network between two computers connected to a Keenetic gigabit router via a 4-pair patch cord. In our case, the computers are connected to ports numbered 1 and 3.
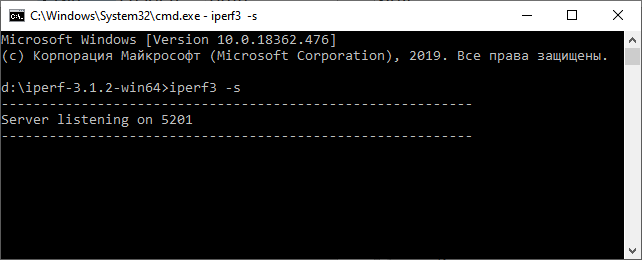
On the computer that will act as the server, in the Windows command line, navigate to the directory where the iperf3 executable file is located and run the command:
iperf3 -s
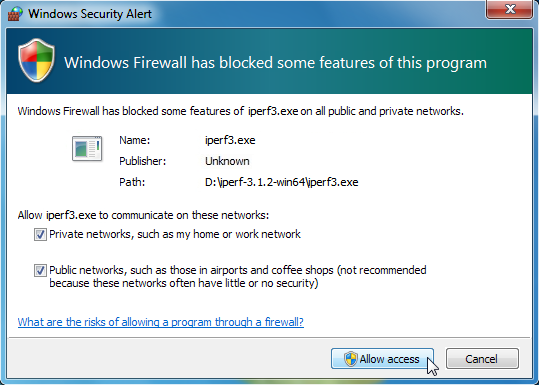
If the Windows Firewall is enabled on your computer, the Windows Security Alert window will appear when you first launch the application. Click the Allow access button to open the port on which the iperf3 application will run.
Avvertimento
Do not close the window with the server running.
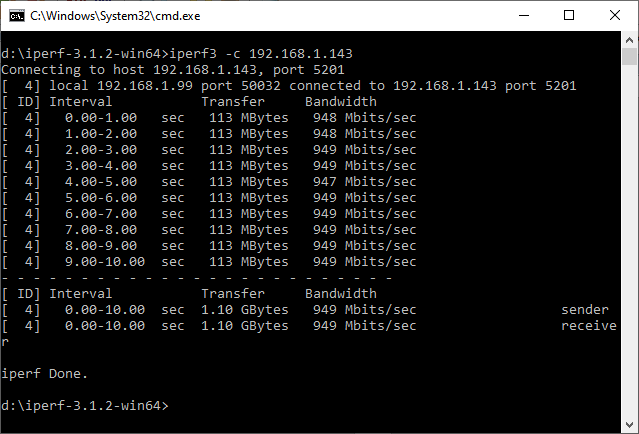
On the computer acting as the client, run the following command to start testing:
iperf3 -c <server_address_iperf3>For example:
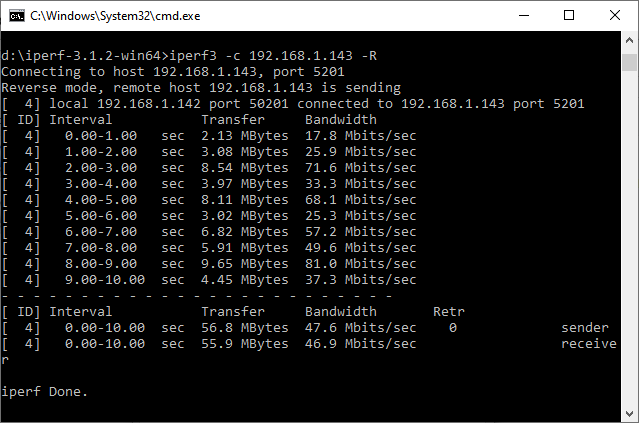
iperf3 -c 192.168.1.143
For 10 seconds, traffic will be exchanged between these hosts, after which the connection will be terminated and the test results will be displayed. In our example, the bandwidth measurement for the local gigabit connection was 949 Mbit/s. In this case, this value is the actual connection speed on the 1 Gbit/s link.
Attenzione
By default, the iperf3 program transfers traffic from the client to the server, uses the TCP protocol, and performs testing for 10 seconds without limiting the maximum speed.
When measuring the bandwidth of the local network through a router with 100 Mbit/s ports, the actual speed was 95.1 Mbit/s.

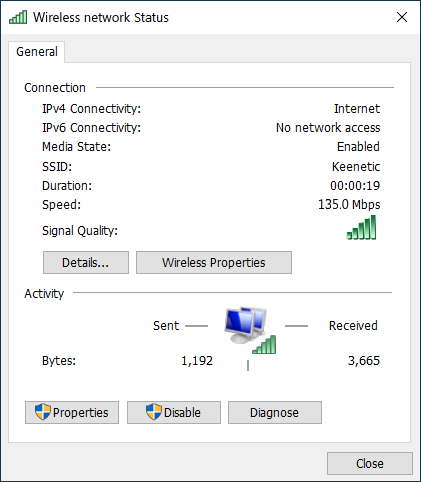
Example 2. Let's take a look at measuring the actual connection speed of a laptop connected to a Keenetic router via Wi-Fi. In our example, the laptop is connected to the router at a channel speed of 135 Mbit/s.
On the computer that is connected to the router via cable and will act as the server (in our example with IP address 192.168.1.143), run the following command in the operating system command line:
iperf3 -s
On the laptop acting as the client, run the following command to begin testing:
iperf3 -c <server_address_iperf3> -R You will then see the result of this command. In our example, the bandwidth measurement for the local Wi-Fi connection was approximately 47 Mbit/s (with a channel connection speed of 135 Mbit/s). This is the actual speed of the connection.
Attenzione
When measuring a wireless connection, it is recommended to enable Reverse Mode to test the incoming speed on the client (in this case, the server transmits data and the client receives it). Add the -R key to the command. When testing a Wi-Fi connection, you may notice that the speed values obtained differ significantly, which is normal and is due to the nature of data transmission in Wi-Fi networks.
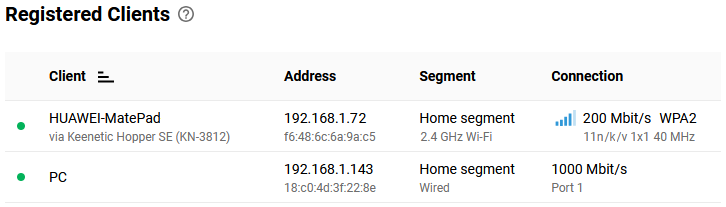
Example 3. Let's consider measuring the actual connection speed on a smartphone/tablet connected to a Keenetic router via Wi-Fi. In our example, the smartphone is connected to the router at a channel speed of 200 Mbit/s.
On the computer that will act as the server (in our example with IP address 192.168.1.143), run the following command in the operating system command line:
iperf3 -s
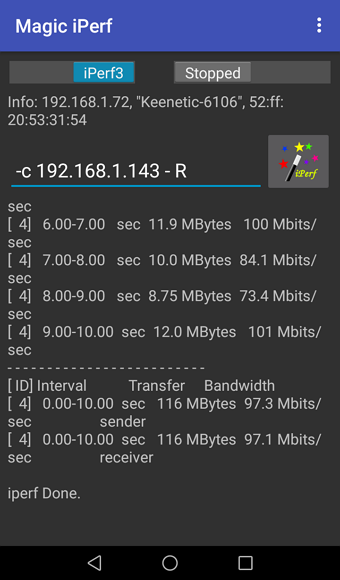
On the Android smartphone acting as the client, install the Magic iPerf including iPerf3 app. Launch it and in the upper left corner of the screen, switch the toggle to the iPerf3 position.
Use a command like this:
-c <server_address_iperf3> -RStart testing by moving the switch to the Started position in the upper right corner of the screen.
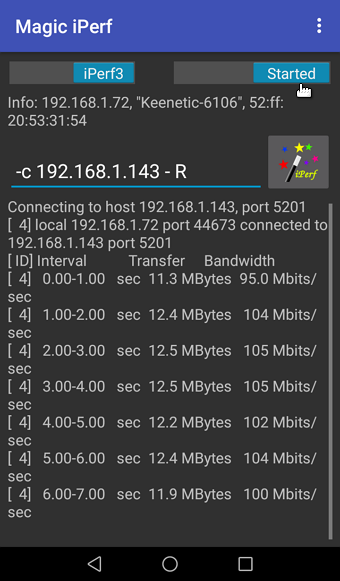
You will see the result of executing this command. In our example, the measured bandwidth of the local Wi-Fi connection was approximately 97 Mbit/s (with a channel connection speed of 200 Mbit/s). This is the actual connection speed of the Wi-Fi client.
Example 4. Let's measure the actual connection speed on a smartphone/tablet connected to a Keenetic router via Wi-Fi. In our example, the smartphone is connected to the router at a channel speed of 200 Mbit/s.
But the Keenetic router itself will act as the server (its local IP address is 192.168.1.1).
Suggerimento
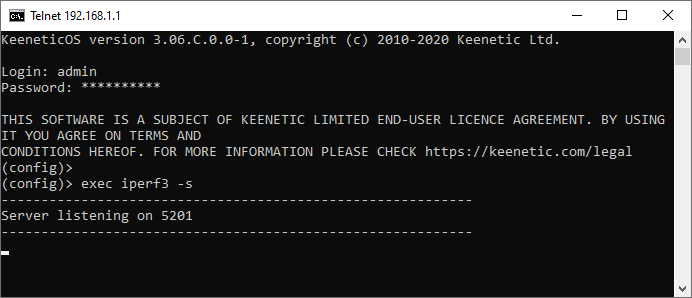
The iperf3 package is present in the KeeneticOS router operating system when the Open Package support component is installed.
Connect to the command line interface (CLI) of the router and execute the command to start the iperf3 server:
exec iperf3 -s
On the Android smartphone acting as the client, install the Magic iPerf including iPerf3 app. Launch it and in the upper left corner of the screen, switch the toggle to the iPerf3 position.
Use the following command:
-c <server_address_iperf3>Run the test by moving the switch to the Started position in the upper right corner of the screen.
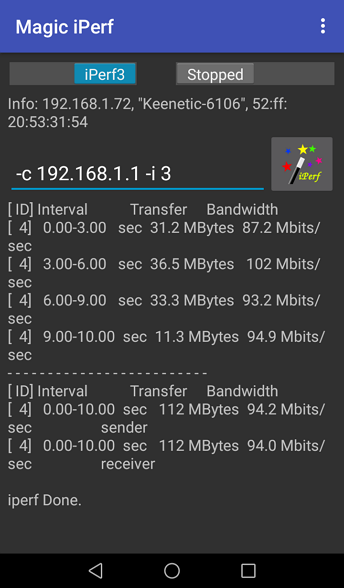
In our example, the measured bandwidth of the local Wi-Fi connection was approximately 94 Mbit/s (with a channel connection speed of 200 Mbit/s). This is the effective connection speed.
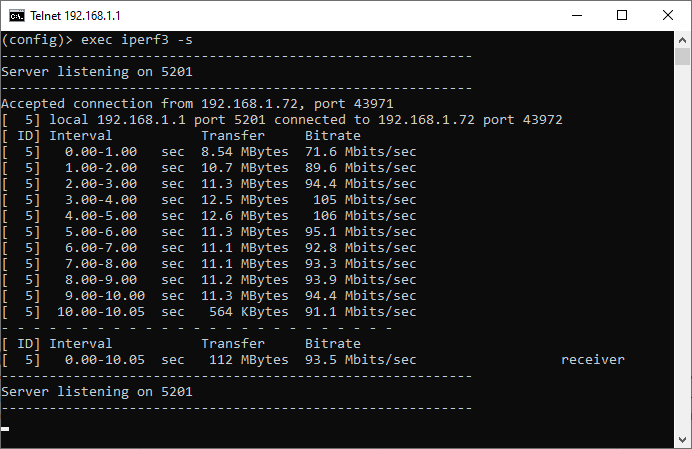
You can also see the test results in the server terminal.
Syntax of the iperf3 command
Let's take a look at the syntax of the iperf3 command and the core (most frequently used) options. You can find a complete and up-to-date list of options on the developer's website.
Usage:
iperf3 [-s | -c host] [options]Common options for server and client:
-p, --port # | port number on which the server/client will operate ( |
-f, --format [kmgKMG] | speed format in test results: |
-i, --interval # | interval between test result outputs, in seconds |
-V, --verbose | more detailed information output |
-d, --debug | additional debug information output |
-v, --version | show version |
-h, --help | show help |
Main server options:
-s, --server | starting the server and displaying information on the screen |
-D, -- daemon | starting the server in the background, without displaying information on the screen; it will remain running even after the program window is closed |
Main client options:
-c, --client <host> | starting the client and connecting to the server |
-u, --udp | UDP protocol instead of TCP |
-b, --bandwidth #[KMG][/#] | maximum speed in bit/s (0 - no limit); by default, there is no speed limit for TCP, and for UDP it is 1 Mbit/s (option /# for batch mode data transfer) |
-t, --time # | test time in seconds (default |
-n, --bytes #[KMG] | number of bytes to transfer (instead of the |
-l, --len #[KMG] | buffer size (default 128 KB for TCP, 8 KB for UDP) |
-P, --parallel # | number of simultaneous concurrent client streams |
-R, --reverse | reverse mode: the server sends traffic, the client receives it. |
-4, --version4 | use only IPv4 |
-6, --version6 | use only IPv6 |
-Z, --zerocopy | method of sending data using the Zero Copy technology to reduce the CPU load |
-O, --omit N | skip the first n seconds (ignore the TCP slowstart algorithm) |
--get-server-output | get the results from the server |
Here are some examples of using iperf3 commands with different options:
Starting a server (with default settings):
iperf3 -s
Starting a client (with default settings):
iperf3 -c 192.168.1.143
In our examples, 192.168.1.143 is the IP address of the iperf3 server.
Nota
A server can only accept connections from one client at a time. If the server is busy with another client, an error message will appear when you try to run the test: server is busy running a test. try again later. In this case, you need to wait for the server to become available.
However, it is also possible to run multiple instances of clients and servers on the same host. To do this, use different ports with the -p <port> key.
For example, you can open two command prompt windows on the server and run the following command in one of them:
iperf3 -s 5005 (server is running on port 5005)and in another window:
iperf3 -s -p 5006 (server is running on port 5006) Now, on one client, run the command to connect to the server running on port 5005:
iperf3 -c -p 5005 192.168.1.143
and on the second client, run the command to connect to the server running on port 5006:
iperf3 -c -p 5006 192.168.1.143
Starting a client with more detailed output:
iperf3 -Vc 192.168.1.143

iperf3 -c -V 192.168.1.143
By default, iperf3 works as follows: the server receives data, and the client sends it. To test the incoming speed on the client, you need to use reverse mode and add the -R key to the command:
iperf3 -c 192.168.1.143 -R
To increase the test duration (default is 10 seconds), use the -t <sec> key:
iperf3 -c 192.168.1.143 -R -t 60
The tool supports multi-threaded testing mode. To specify the number of threads, use the -P <streams> key (in this example, testing will be performed in 2 threads):
iperf3 -c 192.168.1.143 -R -t 60 -P 2
When testing with default settings, the results are displayed every second. Using the -i <sec> key, you can change the time interval for displaying the results (in this example, the interval is increased to 3 seconds):
iperf3 -c 192.168.1.143 -R -t 60 -P 2 -i 3
You can also specify the amount of traffic to be transferred during testing. To do this, use the -n <bytes>[KMG] key instead of -t:
iperf3 -c 192.168.1.143 -R -n 500M -P 2 -i 3
By default, testing is performed using the TCP protocol, but UDP protocol support is also available. To use it, use the -u key:
iperf3 -Vc 192.168.1.143 -u -R -t 60
Unlike TCP, the UDP protocol does not employ packet delivery control and transmission speed control algorithms, and behaves differently on the network. Since UDP does not control the data transmission speed, this must be done by the application transmitting the traffic. By default, the maximum speed limit for UDP traffic is set to 1 Mbit/s. Do not set the maximum speed for the UDP protocol too high, as this may overload the network (we recommend setting this parameter to 100 Mbit/s). You can set the maximum speed limit using the -b <bits>[KMG] key:
iperf3 -Vc 192.168.1.143 -u -R -t 60 -b 100M
Please also note the -l <bytes>, key, which sets the packet length. In UDP mode, set this parameter to no more than 1400 bytes.
iperf3 -Vc 192.168.1.143 -u -R -t 60 -b 100M -l 1400